

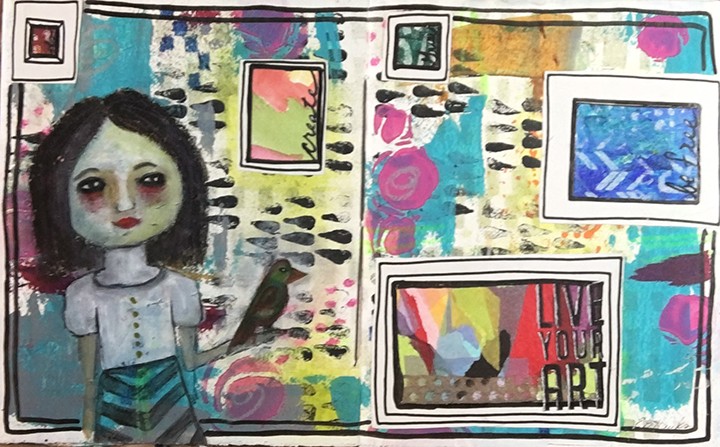
Hot off the inspiring rush of a weekend with my sister learning from Julie Fei Fan Balzar in New York, I printed out one of my favorite pictures from the getaway and created a cool journal page.

My sister, Paula, and I used to participate in an Art Journal Round Robin group. Every time I was working in Paula’s journal I wanted to make her page extra special because:
- 1) she’s an amazing artist
- 2) she’s my sister.
Back in 2015, we’d just wrapped up a fantastic weekend in New York when it was my turn to work in Paula’s art journal. I really liked the picture of us by a cool mural in Harlem (seen below) and wanted to incorporate it somehow. I knew I wouldn’t be happy with the outcome if I tried to just paint it freehand, so I printed it out and glued in in the journal as my base layer.
This is how the page evolved and how you could use the same techniques:

|
Step 1Choose Photo. I liked the creative background on this shot, but it also had space for me to add my own creative take. |

|
Step 2Gesso over areas you plan to completely replace/change. In my example, I gessoed out the background. |

|
Step 3Paint in the background. I painted the background with cool colors and dabs of white using my finger to blend the colors intuitively. |

|
Step 4Embellish with a stencil. I sprayed an acrylic black spray through a stencil in the background. I hated it. Sigh. Trust the process. |

|
Step 5Collage some bits onto your photo. I used gelli prints I created in the NY class and collaged them over the mural face and body. |

|
Step 6Assess and adjust. I fixed the ugly background by blending out the black dots, grabbing a new stencil, and filling it with warm colors using the same application as Step 2. So. Much. Better. |

|
Step 7Add some texture. I mixed some texture paste with black paint and applied it to the mural hair using a palette knife in a pouncy motion. (I also got a jump on step 8 and started to paint our clothes and added clown mouths on accident.) |

|
Step 8Paint any other areas of the photo. I completed painting the girls and fixed the clown mouths. |

|
Step 9Add in details. Using white carbon paper, I traced the mural face back on and used black pen and paint to fill in the shadowy parts. (Notice the 2 little faces sitting on the desk. That was the back up plan if I wasn’t able to recover from clown mouths. lol.) |

|
Step 10Assess and adjust then check shading and highlights. I collaged more gelli paper over the neck area because the previous attempt at shading was hideous. Then, I used Stablio All pencil to add some more subtle shading. |

|
Step 11Add any journaling if you wish. To finish the piece, I glued a quote onto the flap and edged the entire piece with black paint. |
Despite the ups and downs, I was really happy with the finished page. More importantly — my sister squealed when she got it. Mission accomplished.

Sometimes it’s far less intimidating to paint atop an image than to try to recreate it. Do you have any photos that you could see this technique working on?


6 Comments. Leave new
Super cool technique!
Yes I’ve used this technique in the past. I love this technique too❤️😍❤️
Amazing!
great process. I enjoyed it!
I thoroughly enjoyed going through this process with you. Such a great idea and technique. Really appreciate your step by step break down. A wonderful gift for your sister, too. Thank you for sharing!
Boomer,
Thanks for the step by step. I’m much more inclined to do something I’m unaccustomed to doing if I have step-by-step instructions. I might try this technique sometime. 🙂 I’m interested in expanding my artsy side, and this is far from anything I’ve ever done.
Blessings,
Cindy
diybohemian.com