

Lessons for Beginning Embroidery
I decided to explore how to use simple stitch techniques to add dimension to my mixed media artwork for the 100 day project. And I have learned a ton about beginning mixed media embroidery!
Supplies
I knew I would need some new supplies as a newbie beginning mixed media embroidery. For my embroidery project, I bought:
— 100 8×8 inch stretched canvases
— Embroidery floss (Recommend: DMC Variety of 100 colors)
— Pearl/Perle cotton thread (Neutral color variety pack , reds and greens, and blues and purples)
— Embroidery needles
— A metal thimble (I got this inexpensive set with thimbles, seam rippers, and yarn needles)
— Embroidery & Sewing Scissors
Pearl vs. Embroidery Floss
As I have learned in my new endeavor, there are many kinds of embroidery floss on the market. I’ve been using stranded embroidery cotton aka embroidery floss and Perle/Pearl cotton. Other types of floss (rayon, metallic, silk, etc…) seem to always have a warning next to them: they tangle and snag easily and are difficult to work with. I decided to avoid those for the time being.

Pearl/Perle
In the beginning, I was only using Pearl floss because I liked the colors, price, spool sizes, and the fact that it would not “fray.” Pearl floss is a heavier weighted floss and it is a single strand (not meant to be pulled apart). When you embroider with it, it appears to have a shiny sheen and a twisted texture. It comes in several thicknesses: sizes 3, 5, 8, and 12. The larger the number, the thinner the strand. Size 3 is comparable to six strands of embroidery floss, while size 12 is comparable to one strand of embroidery floss. Before I’d learned any of this, I happened to order a mix of sized 8 and sized 5 spools. Eight is a good size.
Embroidery Floss

After I took a couple of classes, I learned the benefit of stranded embroidery cotton floss. The fraying is not annoying; it allows for more flexibility. In my current series, I’m mostly using stranded floss for all of my work.
Stranded embroidery cotton thread is the most common thread used for embroidery work. It consists of 6 strands of thread twisted together and then wound into a skein. 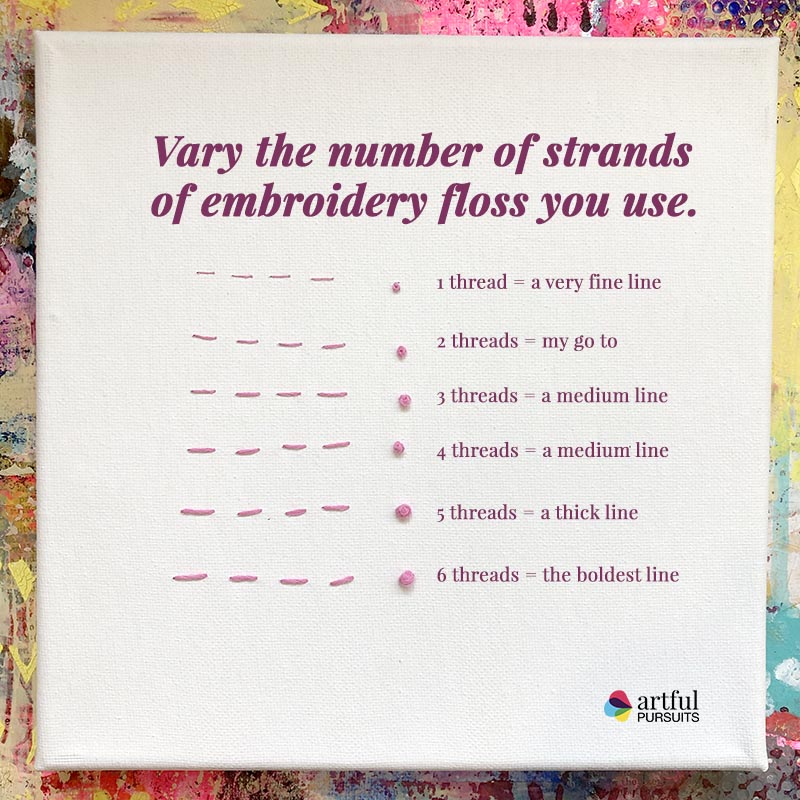
You can thread your needle with the whole 6 strands or separate the thread depending on the effect you want. I liken this to having different line weights in a drawing. If you embroider with 1 thread, you get a very fine line. If you use all 6 threads, it is like a bulky, bolder line. Using different number of strands makes the stitching more interesting.
Organizing Supplies
Once I started using the embroidery materials daily, I quickly realized I needed an organized mobile way to carry my supplies. Many people use plastic bobbin cards and keep their floss in a plastic box. That seems like a perfectly fine system, but I wanted to use what I had on hand.
 For Easter, my daughter received a sewing kit in a cute lunchbox. She completed the projects, so I absconded with the lunchbox and put my supplies in it. Although it was easy to carry around, I soon found the floss began to tangle and swim around haphazardly. I found some clothes pins not being used and wound the embroidery floss around them. It works great. I habitually pinch the end in the clothes pin, so it’s easy to find. It never tangles, and they are easy to look through in the lunch box.
Embroidery floss comes in skeins. Each skein has a unique number. Unfortunately, every brand has a different numbering system. I have a variety of colors I picked up at Michaels. They are all “Loops and Threads” brand which I assume is Michaels generic brand. As I’ve wound them on the clothes pins, I’ve written the color number on the side in a permanent, waterproof pen. So, if I really want to replenish a specific color, I can find exactly what I need.
Embroidery Floss Brands
From what I’ve read, DMC is a great brand of floss. Most craft store brands are just fine. Some people warn that lower quality embroidery flosses are not colorfast and are known to bleed color when they get wet. A website named “Thread Bare” did a full article comparing different brands of embroidery floss and putting them through colorfast tests if you’re interested in the nuances.
Embroidery Tips & Techniques
Tailors Knot
The most valuable thing I’ve learned beginning mixed media embroidery is the cross knot or tailor’s knot. Knowing how to tie this knot is something I will carry with me for life. To tie the knot, first thread your needle. Hold the needle parallel to the floor. Take the tail end of the thread and hold it perpendicular to the needle, making a cross. Loosely wrap the thread a few times around the needle making a coil.
The more times you wrap it, the larger your knot will be. Slide the coils towards the eye of the needle and gently pinch them. Pull the needle forward and the coils backwards along the length of thread. They will become a perfectly neat knot at the end of your thread. Play this 30 second video to see it in action. It’s quick and easy.
10 Beginning Mixed Media Embroidery Flower Canvases
My first 10 beginning mixed media embroidery canvases were all florals. As I progressed through them, I learned various embroidery stitches and techniques. You can click on the framed pics below to get a closer view.
1) Poppies — Intuitive Stitching
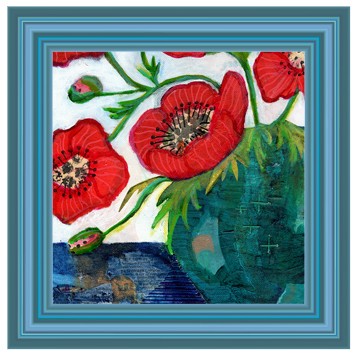
The poppies were first. Embroidery was only used as a finishing touch to the center of the flowers and as subtle texture on the vase and table. I used the Pearl Cotton floss and a large needle. Although the color choices are subtle, I love the texture the stitching produced.
2) Tulips — The Backstitch
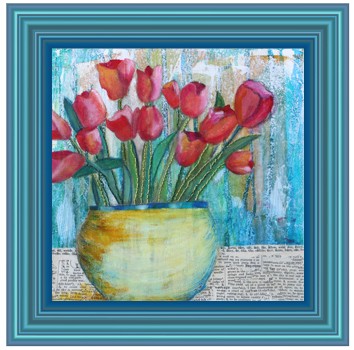
After I painted the tulips, I wasn’t exactly sure where to fit the stitching in. I decided to stitch the stems and loved the final effect. The simply sewn stems helped to differentiate the greenery and lead the eye to the flowers. Although not fancy, the backstitch worked perfectly. It is a staple for a reason 🙂
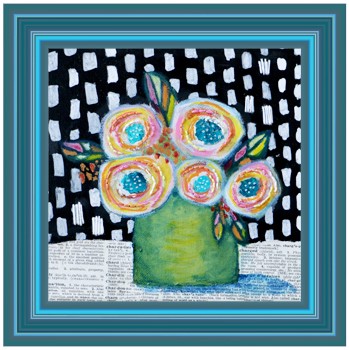
3) Green Vase Modern Flower — The Feather Stitch
The stitching enhances 3 different areas of this complex piece. A messy satin stitch overlays some of the background pattern. A straight stitch creates a highlight on the flower’s stem. The finishing touch is the v-shaped, or fly stitch, which adds color and pattern to the center of the flower.
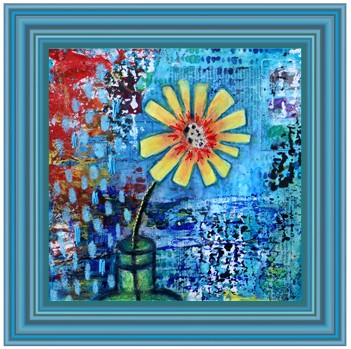
4) Red Wildflowers — The Straight Stitch
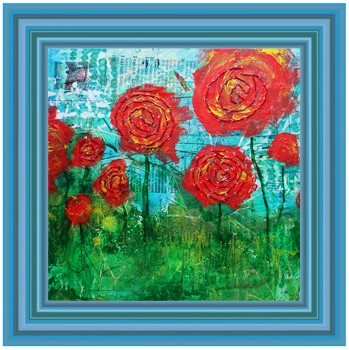
Simple straight stitches make up the embroidery on this canvas. If you look closely, you’ll see that every other stitch in the spiral texture of the flowers is a different red. After this canvas, I began to use a smaller needle because the hole the needle makes should be large enough for the thread to pass through, but not any larger. The needle should not leave a visible hole around the thread. Nonetheless, the spirals served their purpose in suggesting petals.
5) Purple Flowers — Pattern & Outline

Using a simple backstitch, I tried 2 different ideas out on this canvas. I attempted to add some graphic pattern in the taller flower center whereas, I used stitching as an outline on the shorter flower. I really like how the outlining enhanced the flower. That’s a technique I plan to return to.
6) Rainbow Flowers — Messy Satin Stitch Accents
There are 2 stitching techniques used in the rainbow flowers. The first is the back stitch in multi-colors within the flowers. They highlighted the colors well and added a nice dimensionality. Then, I used a messy satin stitch for the first time in select portions of the background. A traditional satin stitch is used to fill large areas of your design. If done right, it will look lovely and smooth. However, I liked the roughed up feel of the messy accent stitching in the background in this particular composition.
7) Mason Jar — Stitching for Dimensional Detail

The mason jar design is one of my favorite of the ten. I love how the mixed media background shows through the jar. The stitching is rather minimalistic, too, which aligned with my intitial intent: use the stitching as mark making. The stitching on the jar makes it look more 3d and the x’s stitched on the small flowers add interest and another pop of color.
8) Striped Vase — Feather Stitching Stems
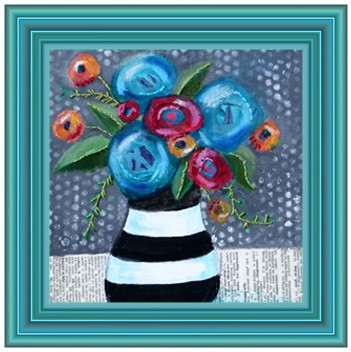
The feather stitching really stands out on this canvas. It adds movement and fun. The colors in the leaves are also well done. More subtley, stitching is used to highlight the flowers similar to the rainbow flowers on canvas #6.
9 & 10) Cherry Blossoms & Sunflower — French Knots
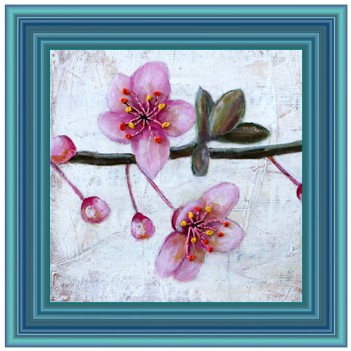
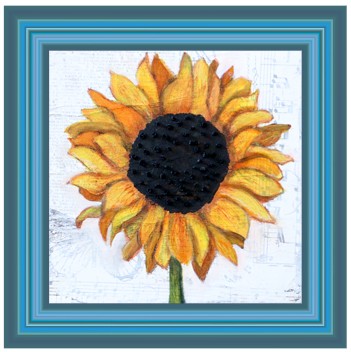
Both of these canvases have predominately white backgrounds with collage elements peeking through making the flowers really pop. I learned how to sew a French knot to enhance the centers of the flowers. I wrapped 3 times for these flowers using a size 8 pearl floss.
Apparently, the French knot is one of the most feared to learn. One thing to remember is you can wrap the needle one, two, three, or more times. The more you wrap the floss around the needle, the larger the knot will be. The thickness of your floss also changes the size of the knot. In the thread sampler picture above, I wrapped the floss around the needle 5 times with different number of strands to show some of the variety you can get based on the thickness of your thread.
In Summary
Using simple stitch techniques has really added dimension to my mixed media artwork for the 100 day project. I have learned a ton about beginning mixed media embroidery. The artwork has a unique flair and I’m excited to finally begin to sell and market my art. I’ll be opening the shop soon. Sign up for the newsletter to be notified!
Let me know in the comments — What do you think about including embroidery on the canvases? Which one is your favorite?


8 Comments. Leave new
[…] difficult, but we managed). Their projects and disciplines are different from mine. There is me embroidering on mixed media canvases, a cartoonist, a witch creating oracle cards, a digital illustrator, a videographer, a portrait […]
As a fellow crafter, you make me want to begin embroidery. I would love to read or watch a step-by-step tutorial on mixed media embroidery. This would be a great gift to give to family and friends who appreciate handmade items from the heart.
Thanks, Stacey. I appreciate the suggestion and will take it to heart. These absolutely would make a fantastic gift!
Thanks for explaining it all in very basic terms. I found it easy to understand. My 12 yo daughter is starting to learn about embroidery and now I can help her!
That’s awesome! My 6 and 14 year old daughters like to sew, but not so much embroider yet. I’ll be doing more posts on the next series soon, so check back for more tips & tricks!
Hi Boomer! Mixed Media embroidery is an amazing idea!! I absolutely love it. Painting can provide such texture to the images, and then you are topping it off with additional details through stitching, where did you eve come up with this idea? This is a great post. Very organized, detailed and with great illustrations. And what a great way to illustrate your artwork. It is the best of 3 worlds.
Thanks, Sherry! I saw an instagram account where a girl was embroidering on canvas instead of a traditional hoop; I never thought of the possibility before that. I have sewn on paper, but never a canvas. I was very inspired to try to use embroidery as a mark making layer in my style of art. I’m loving it. I feel much closer to my artistic voice than I ever have.
All of these are so beautiful. I especially loved the poppies!