

Years ago, I began a tradition of recycling all the gorgeous and personal holiday cards we receive. I found as we removed the holiday decorations annually, I couldn’t bear to get rid of them; however, I didn’t want to simply keep piles of cards either. So, I began to turn them into decor. If you have a pile of lovely cards you’re not sure what to do with, may this simple project tutorial bring you inspiration and less clutter as you start the new year.
Impact of Recycling Holiday Cards
Every year, I take all of the holiday cards and recycle them into a framed piece of décor that we put on display. I first got the idea about 15 years ago from an Ali Edwards book that is no longer in print. At the time, I simply liked the design. I did not recognize how special the frames would become. Now, as we hang them, we remember loved ones who passed away, children who have grown, and the cultural experiences from past military duty stations. My husband and I enjoy hanging them each year and taking a moment to remember and appreciate important people and moments in our lives. They embody what I love about the holiday season.
Project Materials
 Very few materials are needed for this project:
- 12×12 frame
- 12×12 piece of cardstock (any color, but this holiday pack could help if you need filler for your frame project)
- Double sided tape or other adhesive (I love my ATG tape gun )
- Your holiday cards (if you have the card envelopes and letter inserts, those can also be used)
- A 2 inch square punch, paper trimmer, or ruler and scissors
Step 1: Cut Your Squares
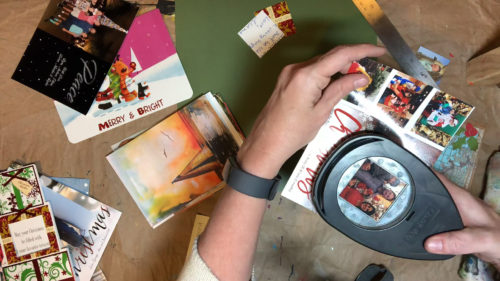 The process is very simple. Punch or cut a 2 inch square from each card you received. First, punch out the photos from photo cards. Next, identify one card to use as the title of the frame. It must be cut out in increments of 2 inches such as 2 x 4 inches or 4×4, etc… Cut it out and set it aside.
After the photos and title are set aside, Iook through the unused cards for lovely handwritten messages. Punch out a 2 inch square highlighting words or messages that resonate with you. It doesn’t matter if the message is cropped so much that it can’t be understood. It is not meant to be read; rather it is another graphic element.
Next, look through the cards you haven’t cut from yet and cut out a 2 inch square of parts of the imagery you like.
Attempt to cut a 2 inch square from each card. Don’t forget to also look at the envelopes for cute stamps or designs. As a military family that moves often, I also include at least one square that shows our address at the time.
Continue until you collect enough squares to cover the 12 inch paper. You need 36 2×2 squares to cover the 12 inch cardstock. If your chosen title treatment is bigger than 2×2, the number you need will decrease slightly. If you don’t have enough squares to cover the full piece of cardstock, you can leave a border, leave some spots blank, or fill in the blank spots with wrapping paper or decorative paper.
Step 2: Determine the Layout
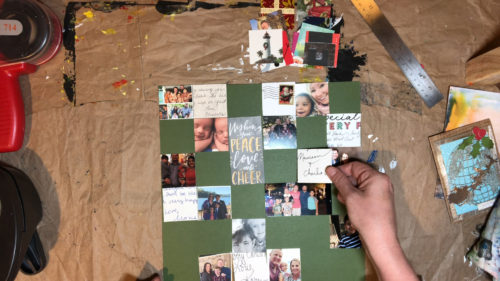 After you have enough pieces to cover the full piece of cardstock, lay it out. Try to take a Sudoku approach — look at the content considering both the rows and the columns. Vary the photos, handwriting, and graphics in each row and column to create a visual balance.
Work the title into the upper half in a somewhat central location. Near the title square, add the year if it isn’t already apparent either by writing, stamping, painting, or gluing scrapbook numbers atop a square.
Step 3: Adhere and Frame
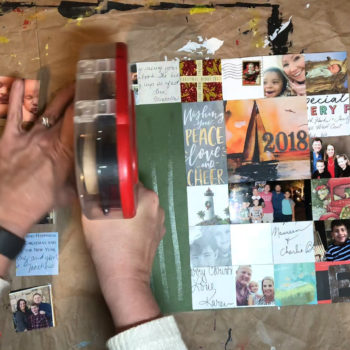 Once you are happy with the placement of each square, use your adhesive to attach everything to the cardstock and pop it in the frame.
Storage
For maximum effect, when you put away your holiday decorations, put this frame away. It feels fresh each year when you pull it back out and you can really appreciate it as the next year’s cards begin to roll in.
I hope this simple project for recycling all of the gorgeous and personal holiday cards you receive brings you inspiration and less clutter as you start the new year.
If you’re interested in more tutorials, art lessons, inspiration, and freebies, sign up below for the newsletter. I’ll send you a freebie right away!


1 Comment. Leave new
This is such a cute idea!