

Anyone decorating a room, wanting to make a custom gift, or needing a custom sign can benefit from this quick tutorial on how to make wood signs at home without an expensive machine, stencils, or special hand lettering skills.
Supplies
- A word processor (Microsoft Word or the equivalent) and a printer
- A ruler (to determine the size of your sign)
- Pencil, pen, stylus, or other sharp writing tool
- Transfer paper (white or black)
- A wooden sign (dark or light wood)
- Paint pens and/or paint
- Baby wipes and paper towels
How to Create a Wooden Sign
Choose Your Wooden Sign Base
If you salvage wood, you’ll want to prepare it. Clean it well and let it dry. If you want to stain it a different color, do that now.

Blank wood signs are available for purchase at Amazon, Michaels, and WalMart among other stores in a variety of sizes and finishes. I bought this inexpensive white wash rustic wood plank with the rope already attached for my project to save time. There is also a dark wood version if that’s more your aesthetic. I’m considering trying to make signs from these Cedar Grilling Planks. They are a similar size, cheaper, and I don’t see why it wouldn’t work if I just stapled jute to them.
Video Tutorial
Determine Your Design
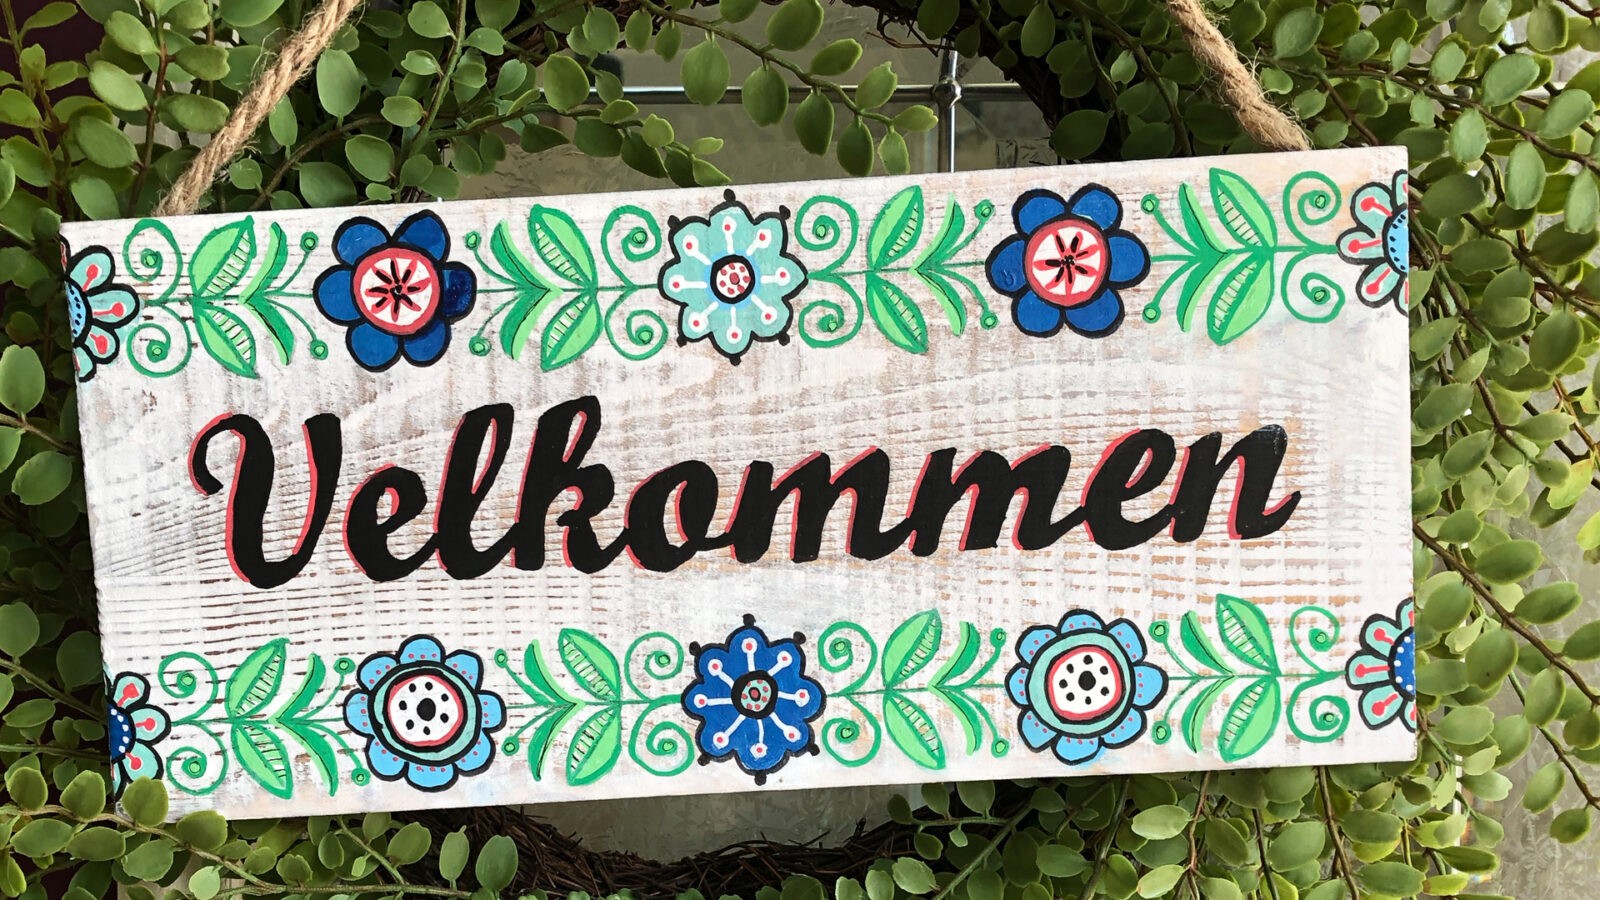
Choose a font and design. Print it out to match the size of the wooden sign you plan to create. My wooden sign is 12 inches by 5.5 inches.
To size my design, I used Photoshop to create a 12 x 5.5 inch file. You can use Microsoft Word for this just as easily, but I’m a daily Photoshop user, so I stayed in my comfort zone. I printed it out on a regular 8.5×11 sheet of paper. If you have a larger sign, you can print it out in multiple sheets and place them on the board as you want the final design to appear.
 Next, I typed out what I want it to say. Velkommen means ‘Welcome’ in Norwegian. We live in a small Washington town they call Little Norway. There are Velkommen signs all over the place. My husband wanted one to add to our foyer where we display welcome signs from a multitude of cultures and places we’ve lived as a military family.
After sifting through font options, I settled on Marcelle Script, a free font from dafont.com. The letters are script, yet still thick. I printed out a test page and held it up to the wood sign. The sign had too much white space for my liking. I Googled, “Scandanavian flower design” and found the border flowers to add. Satisfied, I printed out the design.
Note: If you have a hard time getting your design elements in the right place, print them out separately and place them on your sign the way you want them arranged.
Choose the Transfer Paper
![]() Choose a transfer paper that will contrast well with the color of wood in the background. I have three kinds of transfer paper: carbon black, graphite, and white. There are others, but these cover all of my needs. The grey graphite paper doesn’t transfer well to wood in my experience, so I recommend using the carbon black if you have a light colored wood base. The Saral white works great if you have a darker wood background.
Choose a transfer paper that will contrast well with the color of wood in the background. I have three kinds of transfer paper: carbon black, graphite, and white. There are others, but these cover all of my needs. The grey graphite paper doesn’t transfer well to wood in my experience, so I recommend using the carbon black if you have a light colored wood base. The Saral white works great if you have a darker wood background.
Transfer paper is great to have in your art stash or office supplies. It lasts forever as it can be reused multiple times. I keep one sheet of each type folded up in my travel art supplies all the time.
Transfer the Design
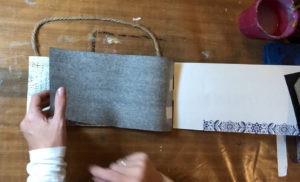 Once you determine the proper transfer paper to use, place it on the sign face down. If you aren’t sure which side should be down, put the paper on your sign and attempt to make a test mark on the paper with your fingernail and see if it transfers. If not, flip the paper over and try again.
Once properly oriented, place your design print atop it facing up. Tape them down on the sign so they won’t move, but don’t secure it so strongly that you can’t occasionally lift the papers up and check your progress in the next step.
Trace the Design
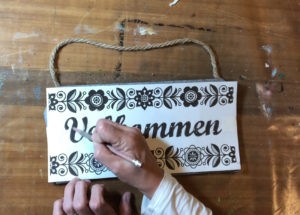 Use a pointy instrument like a pencil, ball point pen, or even a stylus. Push down with some pressure and trace the entire design. Occasionally, carefully peel back the tape on one side and peek under the papers to ensure the design is fully transferring. Once complete, lift one side and check to see if you missed any details before you remove the transfer paper and design. Once you remove them, it’ll be impossible to get them back in the exact same place.
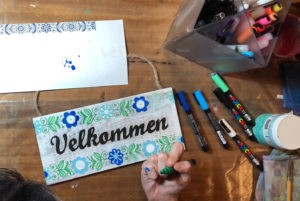
Color the design
Use paint or markers to color in your design. I love Posca markers because they flow nicely and have a small enough tip to do detail work. Acrylic craft paint with a small brush also works well. If you use multiple colors as you fill in your design, repeat them throughout your design to maintain unity and cohesion. For a really customized look, add more details and marks after you block in the initial colors.


Tips for Mistakes
 If you make small errors as you paint your sign, you can use a baby wipe to wipe the paint off. On the other hand, if you have a larger error that will smear considerably, wait for it to dry and then paint over it.
In the bottom middle flower, the acrylic paint pen leaked, so I moved to a different part of the sign to work until it dried and then touched it up with some gesso.
The End Result
 You don’t need to have a fancy cutting machine to create stencils or amazing hand lettering skills to create one of these on-trend signs. Let me know in the comments what custom sign you might try to make. I’d love to see how it turns out.
Products Used


6 Comments. Leave new
I love wooden signs. It’s something I’ve wanted to experiment with making myself.
Yours is so cute. I love it.
Thanks, Lisa. I’d love to see it if you make one.
I love you made this so easy, and it’s Adorable!
It is easy and you can probably do it with supplies on hand (unless you don’t have a wood sign or transfer paper. Those are kind of necessary. lol)
Your Creativity and Talent amazes me!
Love the video! Great job!
Thanks! I really appreciate your feedback especially on the video.